
Get started
Track, qualify, and convert leads to customers
Capture and manage potential customers in the Heyzack CRM — qualify leads, generate partner referral tokens, and convert them to orders.
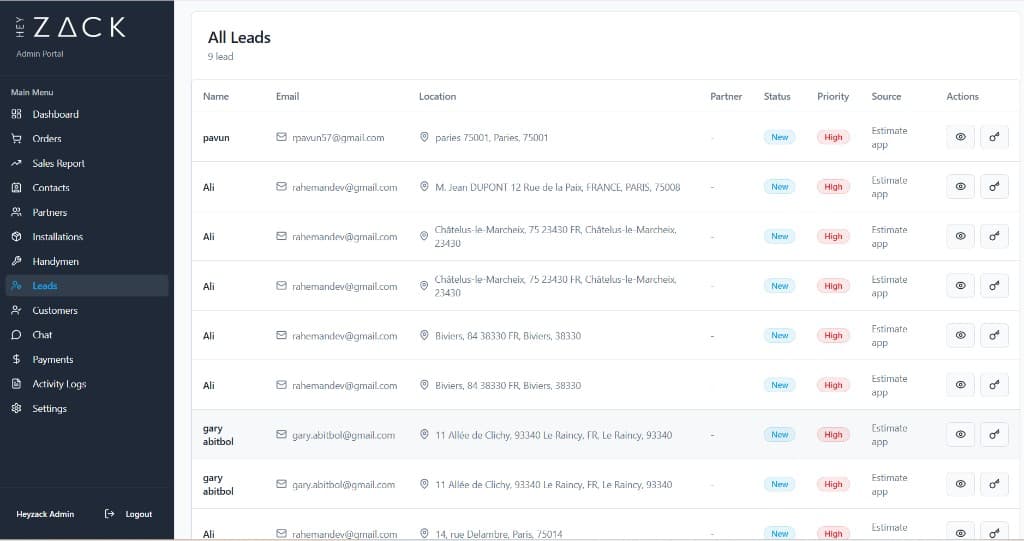
The Leads page lets you manage every potential customer from the moment they first express interest through to conversion. You can capture new leads manually, track how a partner brought them in, filter the pipeline by status or priority, and generate a personalised portal token so a lead can self-serve their quote — all from one table view.
What is a lead?
A lead is a record representing a potential smart home customer. Leads enter the system in two ways:
- Partner referral — a partner shares a unique referral link (generated via the Generate Token feature) and the prospect submits their details through it.
- Manual creation — a member of your team creates the lead directly in the portal using the Create Lead button.
Each lead captures the customer's name, email, location, the partner or team member they are assigned to, the lead's source, and its current status and priority.
Lead statuses
New
The lead has just been created. No contact has been made yet.
Contacted
Someone from your team or the partner has reached out to the lead.
Qualified / Quote Requested
The lead has been assessed and is a good fit, or has actively requested a quote.
Converted
The lead has become a customer and has been onboarded into the system.
Browsing leads
The search and filter bar at the top of the Leads page gives you three controls:
- Search — match leads by name, email address, or location. Results update instantly as you type.
- Filter by Status — show only leads in a specific stage. The dropdown is built dynamically from the statuses present in your data, so only statuses that actually exist in your pipeline appear.
- Filter by Priority — narrow leads to High, Medium, or Low priority. Priority badges use colour coding: red for High, amber for Medium, and green for Low.
Both the status and priority filters work together with the search field, so you can combine all three to find exactly the leads you need.
Creating a lead
Open the create dialog
Click the Create Lead button in the top-right corner of the Leads page.
Fill in the lead details
Enter the customer's name, email address, location, and any other relevant information such as the source, priority, and assigned partner.
Save the lead
Submit the form. The new lead appears in the table with a status of New.
Generating a token
The Generate Token feature creates a personalised, time-limited link you can share with a lead so they can access a self-service quote or onboarding flow — without needing a full portal account.
Locate the lead
Find the lead row in the table. You can use search or filters to narrow it down.
Click the key icon
In the Actions column, click the key icon button next to the lead. This opens the Generate Token dialog.
Copy and share the token
The dialog generates a portal token for that lead. Copy the link and send it to the customer via email or messaging.
Note
You can also generate a token from the Orders page when a matching lead is found for an order's email address. If no lead exists yet for that email, the portal prompts you to create one first.
Lead details
Clicking any lead row (or using the eye icon in the Actions column) navigates to the full lead detail view. Here you can see all the information captured for the lead, the assigned partner, source, timeline, and conversion history.
Converting a lead
Once a lead reaches Qualified status, it is ready to be moved through to conversion. Converting a lead creates or links a customer record and an order in the system, marking the lead's status as Converted. After conversion, the Generate Token button is no longer shown for that lead because the customer has already been onboarded.
Tip
Keep lead statuses up to date as your team progresses conversations. Accurate statuses make the pipeline filters useful and give partners visibility into how their referrals are progressing.