
Get started
Configure menu access permissions per user
Control which portal sections each Manager or Support user can see by enabling or disabling individual menu permissions when creating their account.
Menu permissions determine which sections of the Partner Portal sidebar a user can navigate to. When you create a Manager or Support account, only the menu items you explicitly check are visible to that user after they log in. Admin accounts always have access to every section, so permissions are not evaluated for them.
Available permissions
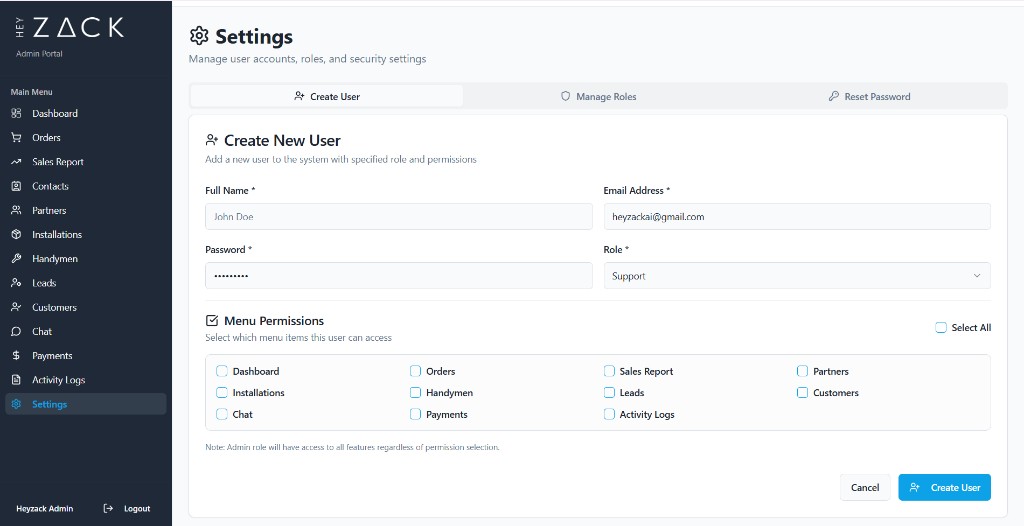
Each checkbox in the Create User form maps to one menu section. The table below lists every permission key and the section it unlocks.
| Permission | Unlocks |
|---|---|
dashboard | Dashboard |
orders | Orders |
sales_report | Sales Report |
partners | Partners |
installations | Installations |
handymen | Handymen |
leads | Leads |
customers | Customers |
chat | Chat |
payments | Payments |
activity_logs | Activity Logs |
Setting permissions when creating a user
Permissions are configured at the bottom of the Create User form in Settings → Create User.
Scroll to the Menu Permissions section
After filling in the user's name, email, password, and role, scroll down to the Menu Permissions panel.
Check each section you want to grant
Tick the checkbox next to every menu item the user should be able to access. Unchecked items will be hidden from that user's sidebar.
Use Select All if needed
Tick the Select All checkbox in the top-right corner of the permissions panel to grant every permission at once. Unticking it removes all permissions.
Create the account
Click Create User. The selected permissions are saved to the account and applied on the user's next login.
Admin override
Info
Admin users always have full access to every menu section. Permission checkboxes are ignored for Admin accounts — you do not need to configure them when creating an Admin user.
Permissions only affect the Manager and Support roles.
Updating permissions
Permissions are set at account creation time. The portal does not currently provide a form to update individual permissions on an existing account.
To change a user's menu access, delete the existing account and recreate it with the updated permission set.
Warning
Removing a user's access to a section will immediately hide that menu item for them on their next login. Make sure the user is aware before you recreate their account with reduced permissions.
Tip
If you only need to change a user's role (not their individual menu permissions), use Settings → Manage Roles → Edit instead of deleting and recreating the account. See Create and manage user accounts for details.